

This may seem like a strange time to discuss backpacking with type 1 diabetes as many trails are closed, national parks are closed, and organizations like the Appalachian Trail Conservancy and the Pacific Crest Trail Association are recommending that people postpone or cancel trips due to COVID-19. Furthermore, The American Hiking Society at this time does not recommend camping as it is likely that trips may require using shared restrooms, shopping for nonessential supplies, and stops for gas and restroom breaks during which you may come into contact with others.
“Please postpone or cancel your Pacific Crest Trail plans due to COVID-19.”
Pacific Crest Trail Association (March 19, 2020)
While it might be tempting to escape to the outdoors, this is not the best time to take on a long, popular, or somewhat risky trip. That being said, this is not a terrible time to research and begin planning trips for the future. While it is unclear at the moment when many trails will reopen and these trips may become available again, it doesn’t hurt to start planning a fun outdoor adventure to look forward to. You can even start training in and around your house and/or neighborhood (social distancing walks and runs are currently still allowed).
Ironically, I’ve recently gotten a number of questions on backpacking with type 1 diabetes, so while I don’t have any backpacking adventures coming up, I’ve updated my list of important things to consider and pack if you’re planning to head out into the backcountry when you can do so responsibly.
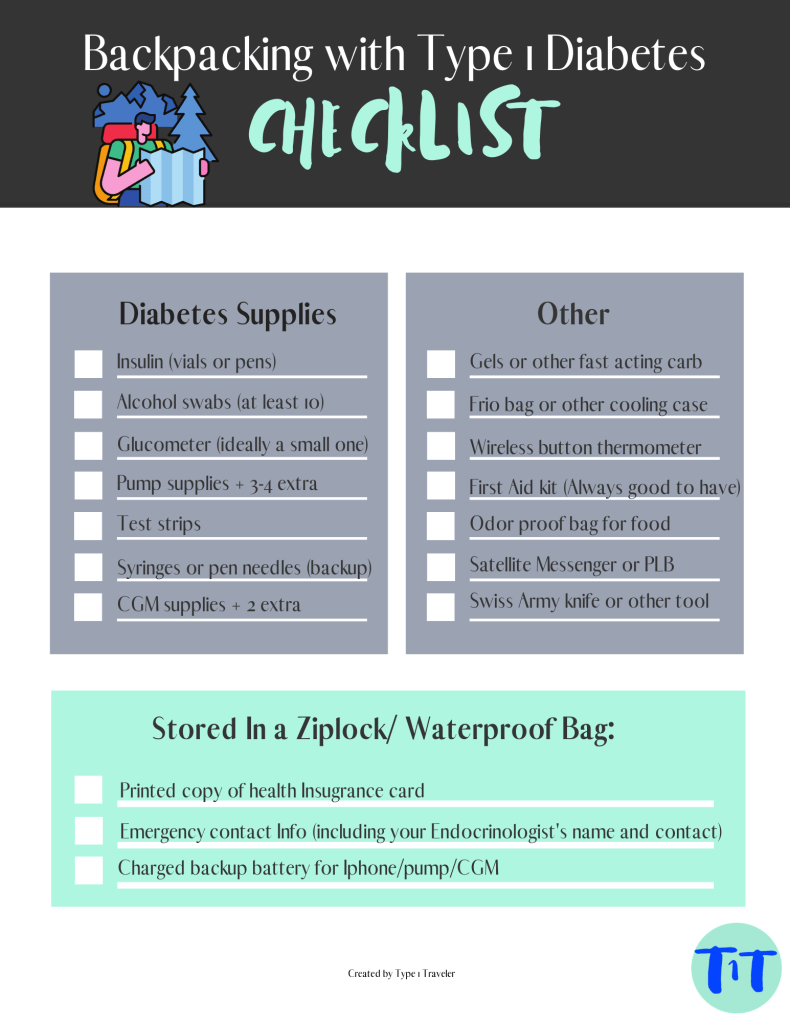
Consider Packing these Items
- Gels: (3-4/day) What some may not realize is that walking with a heavy pack on your back all day is hard work, and for many of us, not something we do regularly. Suddenly you’re carrying more weight and your muscles are probably taking up and utilizing more glucose. Bring on the low blood sugars! I find that gels are the most efficient. They pack a lot of fast-acting glucose into a light little packet (perfect for backpacking), and I can just take one out and eat it on the road. I prefer the Honey Stinger brand, because they taste the most natural to me, but there are many great fuel options out there. I keep about four of these handy in the front hip pockets of my backpack in case I get low on the trail. I also keep at least 2 of these in my pockets at night (yes out of the bear canister) in case of emergency. Other hikers (shoutout to John) recommend roll lifesavers for lows. I haven’t had any issues with bears at night, but then again, I’ve only hiked in regions with black bears, and never in grizzly country. While black bears can certainly do some damage, a bigger concern for me is having easy access to glucose at night in case of lows.
- Odor proof bags: I’ve never used these, but if you are concerned about protecting food from wildlife, these might be a good idea. A friend of mine lost a bag of peanut butter pretzels to a raccoon on the Trans-Catalina Trail. We definitely didn’t starve as there’s a general store (and beach bar) once you get to Two Harbors, but on more remote trips, loss of food to wildlife might be cause for concern. These bags by LOKSAK OPSAK used in conjunction with other bags or even a bear canister seem to have good reviews. I will definitely be picking up some of these to store food on my next trip.
- Insulin pens with needle: Bring a pen or two even if you have a pump. Pens are a lot more convenient for treating highs trail-side if you have a pump issue than syringes and bottles of insulin. While they may hold less insulin, they are light, compact, and considered more stable at room temperature than vials of insulin. They can also be used to refill your pump. While not all insurance companies will cover both pens and vials, consider asking your doctor for a prescription for backup in case of pump failure. Note, I’ve had luck with insurance approval if the prescription is written this way.
- Frio Bags or Cooling Case: I use Frio bags on spring and summer trips to keep insulin cool. According to the website, when used properly in temperatures of 100°F, they should keep contents between 77-79°F for a minimum of 45 hours per immersion. I find submersing the bags in cold alpine lakes to work pretty well. They also may help protect insulin from freezing at cold temps. That being said, if you’re hiking in hot temps 80+°F it might be advisable to take extra precautions. Reader John Nelson recommends use of a wireless button thermometer to monitor insulin temps. The Inkbird and the BlueMaestro Tempo Disk are both compatible with Iphone and Android, allowing you to monitor temps on your phone. MedAngel makes another popular wireless thermometer that should be compatible with your phone as well.
- If on a pump, extra pump supplies: Ladies and gentlemen this one is obvious. If you have a pump bring at least one pump set change if you’re going overnight and possibly two to three extra if you’re going on a 3-4 day trip. You never know what might happen on the trail. I’ve had trips where multiple sites have been ripped out for various reasons (sweat/rubbing from backpack straps, swimming in alpine lakes…etc.)
- Medical tape/First Aid Kit: It’s useful for many things including blisters, but I’ve also used it to tape my site to my body in a pinch. Also extra alcohol swabs have come in handy on multiple trips.
- Satellite Messenger or PLB: I have a Delorme InReach for emergencies. I’ve never had to use it, but it’s nice to take extra precautions when you have a medical condition. In fact, these are useful to have on hand for anyone, as you never know what might happen on the trail.
Other Considerations
- Pump Sites: Consider inserting your pump somewhere where the backpack won’t rub. I’ve worn mine on my thigh when backpacking or higher on my stomach. On one of my trips, I had two sites ripped out of either hip by my backpack. It’s not something I considered before starting out on the trail, but my backpack is made to rest its weight on my hip bones. The sweat and weight just rubbed my site out, something I didn’t realize until I set my pack down and began to set up camp. I was actually happy to be running on the high side after all the lows on the trail and simply didn’t notice that the site had ripped off. Anyways, I would say prior to the trip consider your insertion site and ALWAYS have a backup.
- Temporary Basal Function on a Pump: Even though I’m extremely active, I don’t typically walk over ten miles a day with a large heavy pack. For me, this change in activity level greatly increases my risk of hypos. I’m typically able to make up for this by decreasing my basal rate by 60-70% and having lots of snacks. I still have a few lows when climbing for long periods of time, but I was able to minimize these by reducing my insulin on board (IOB). That being said, with reduced IOB you may find you have higher blood sugars later on, so take this into consideration. As I recently upgraded to Tandem’s Control IQ system, I no longer have the ability to set temporary basals, and I will be curious to see how Activity Mode will work for backpacking. So far, I have found that I still have to suspend insulin and hour prior to a run to prevent lows, but backpacking may be different.
- Your CGM is your Best Friend: Watch those trend arrows. Anyone with T1D knows that frequent lows can be exhausting, but luckily we now have technology (that needs to be made accessible to everyone) that can help catch and prevent lows. I keep my low snacks in my hip pockets while hiking for easy access, and snag a gummy or two when I see those arrows dropping.
More On Keeping Insulin on the Trail
- Pack your insulin deep in your pack, near the bottom. The bottom/middle of your pack tend to stay the coolest, so this is a good place to keep your insulin cool. This is of course taking a gamble, it is possible that if it’s really hot and your pack is out in the sun, the bottom will heat and your insulin with denature; however, I’ve been lucky on my trips and never had any problems with insulin.
- Instant cold packs or Frio Cooling Case: See above
- Winter camping: In some circumstances you may have to worry about insulin freezing rather than overheating. On winter trips I typically keep my insulin in a jacket pocket (inside my sleeping bag overnight) to minimize the risk of freezing.


Thanks to all who wrote in with questions and tips on my previous post!
Please don’t hesitate to reach out by email or comment below with questions, comments, or additional recommendations. As you can see, my tips and packing list have both evolved over the past couple of years, thanks to your feedback, great tips, and recommendations for backpacking with diabetes.
I’ve learned so much over the years from this community, and I am excited to get out there and continue learning once it is safe and responsible to do so.
Also…
Happy Earth Day!

One thought on “On Backpacking with Type 1 Diabetes- An Update”